To set up the ability to accept different types of payments, you first have to enter the new type of payment into a list. This type of list is kept in a central file of valid list entries which is accessed via File Maintenance | Edit Valid Lookup Data. You want to define a specific category of entry. The category is UTYPEPAY as shown below:
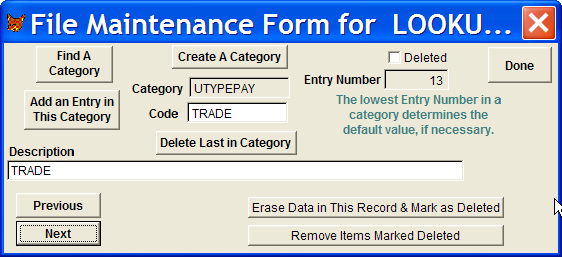
First see if the category is already in place. Click on the Find A Category button at the top left of the form and see if UTYPEPAY is listed. If it is, select it and make sure it looks like the entry above. If it does not exist, use the Create A Category button. A blank form will appear that lets you enter a category. Note the entry number does not matter at all for this procedure.
Once the above entry is in place, you need to check the box in the Company Control Form to allow use defined payment types. It is on one of the Option Pages, page 3 at this time. If you do this in AR, you will have to restart the program to make it work. After doing the above, UTYPEPAY payments can be recorded in AR. For AR to see the order, you need to Final the order. In AR leave any/all check information blank. Enter the payment amount in the appropriate row and click the button to record the payment. A question is presented asking if you would like to record this payment as a special type of income. When you select Yes, a form presented as shown below:

You must select your Type of Payment entry from a list that is presented when you try to type anything in the box. You can then assign a reference # to the transaction and proceed. You will have one more chance to cancel the payment. So if you get here by mistake you are not forced to record the mistake. When you apply the payment you are done.
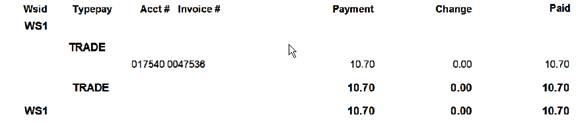
You can see trade payments in the Money Received report as shown below:
|
|